How I use Airtable to track Cost per Fit
plus, this week's outfits
My personal mission this year has been to maximize the wear of items already in my closet, with the goal stretching the money spent on purchasing these items is as far as possible. This doesn’t mean I won’t purchase anything new, but this mindset has already helped reduce my spending on new clothing, shoes, and accessories, which is helpful for other financial goals I have this year, like paying off student loans and saving up for a wedding.
Airtable has been a great tool for keeping track of my wardrobe statistics, daily outfits, and cost per fit. I know others have found a lot of value in platforms like Indyx, Stylebook, or Whering, but as someone who doesn’t have a need to visualize outfits or consult experts, I’ve found that Airtable is a great free and customizable platform that does exactly what I need.
In this newsletter, I’ll walk through how I use Airtable and share a link to my Airtable template that you can duplicate and customize for free. I’ve also included a snapshot of last week’s outfits, so you can see how they get logged in the template. This post may be a bit longer than usual and get clipped in email, so be sure to click on the title to read it in your browser.
Using Airtable to track Cost per Fit
Note: Screenshots are taken from my template link and include a portion of real items in my wardrobe. The template doesn’t contain all items in my wardrobe, but I wanted to include a sample so that you could see how the tracking/formulas worked.
The Closet Tab
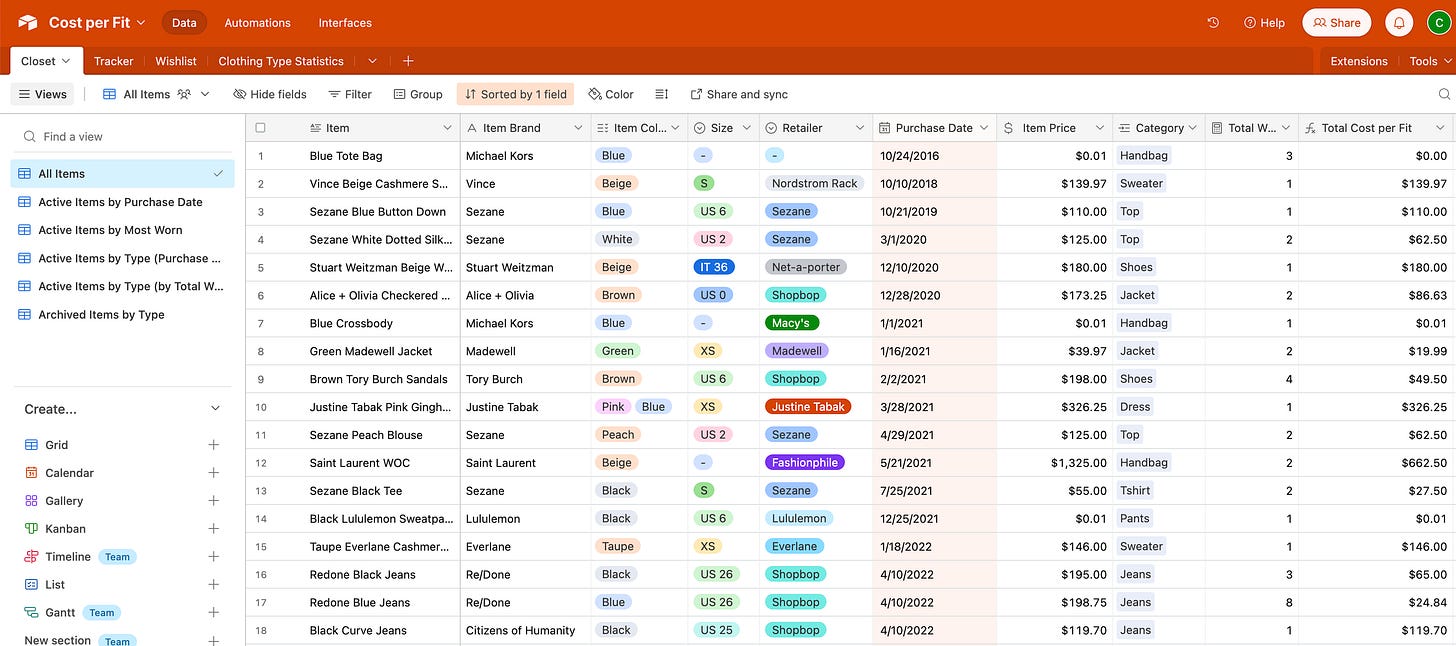
I use the “Closet” tab to input information on each item in my wardrobe. This took a little bit of upfront time when I was getting started, but now I only need to make additions to this tab when I purchase a new item.
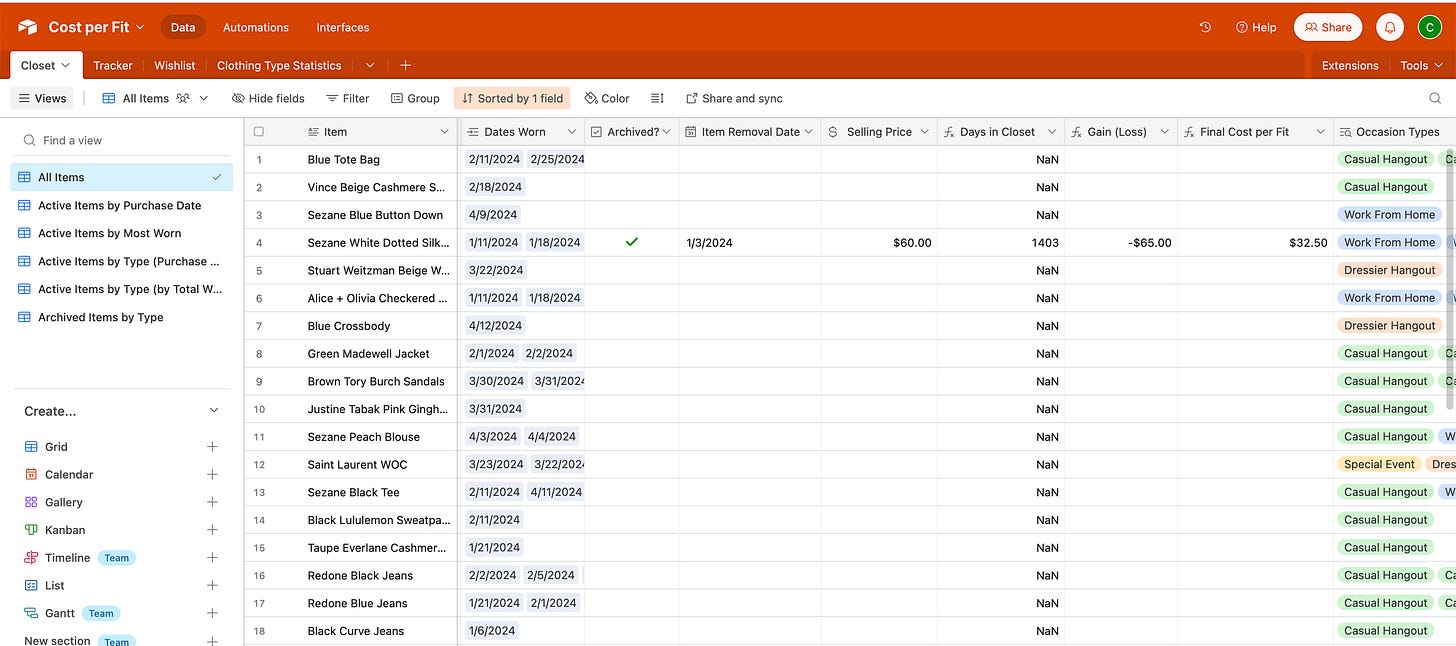
The first 8 columns of this tab (Item to Category) need to be filled out for every item and the rest of the columns have formulas that will automatically update based upon other activity on the tool. If I don’t know the exact metrics for a specific item, I put in my best guess. If I received an item as a gift from someone, I enter the item price as $0.01, otherwise the remaining formulas won’t work.
To the right of the “Category” column, you’ll be able to see some stats for total wears, Cost per Fit, as well as links to the individual days that items were worn. A year ago, I also added in the ability to “Archive” an item if you removed it from your wardrobe. You have the option to add in a “Selling Price” and “Item Removal Date”, which will tell you how long an item was in your wardrobe and will reduce the overall cost per wear as the net cost of the item has decreased.
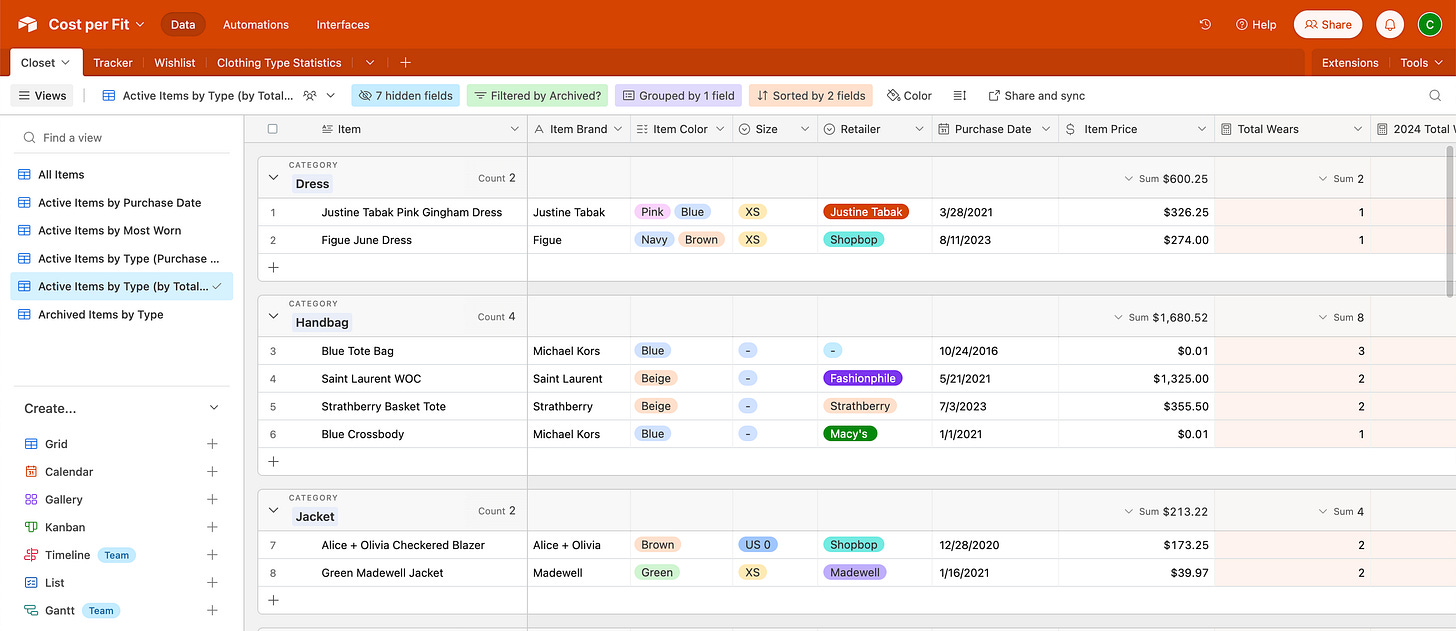
There are several “views” in the left hand column that have been created to organize this information in different ways. For example, the “Active Items by Type (by Total Wears)” view helps you see which items have been worn the most per category. From looking at this view, I can see that the “Blue Tote Bag” has gotten the most wear out of the handbags in my closet at the moment. These views often have some cold hard truths about the items in my closet and which ones are getting lots of wear and which ones are not. If an item in my closet has not gotten any wear and it’s been there for a while, I ask myself - Can I pair this item with something else in my closet to get more wear? Or, is it time to rehome this item?
The Tracker Tab
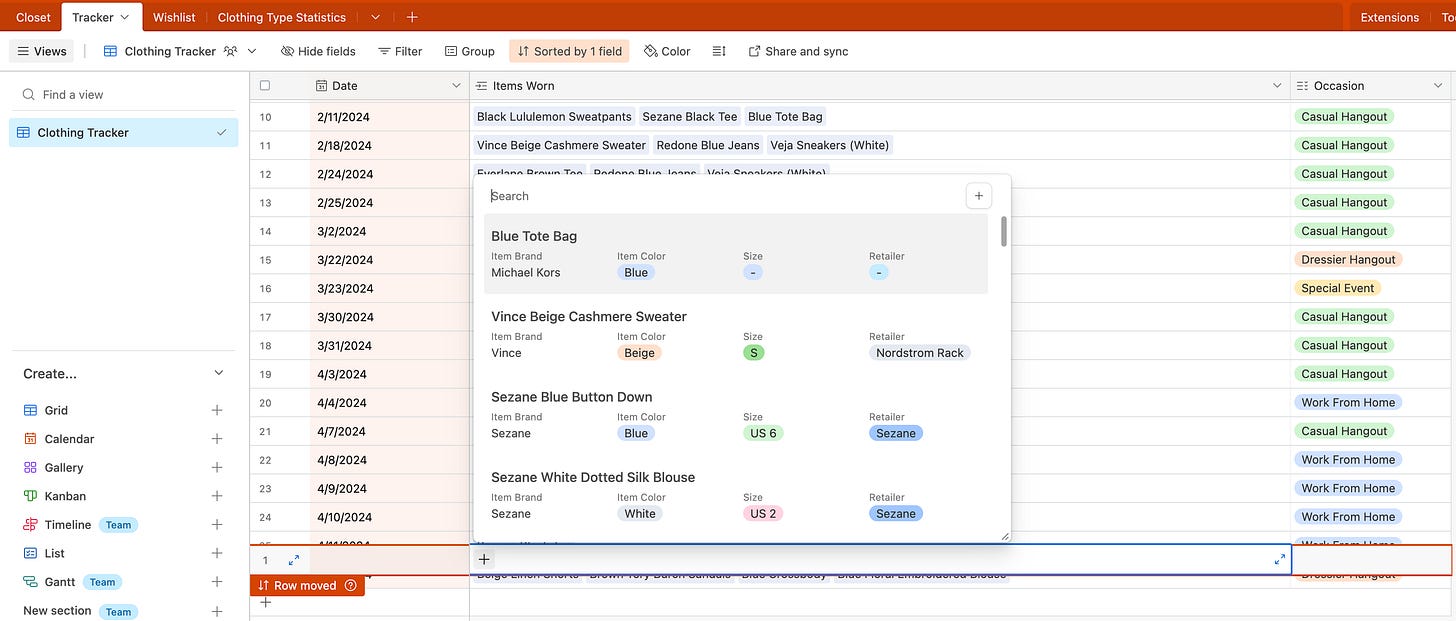
I use the “Tracker” tab to log my daily outfits as well as the occasion for the event. Airtable will pull the items that you entered from your “Closet” tab, which is why it’s important to enter that information first. The good news is that once you’ve entered it into the Closet tab, you’ll never have to re-enter that information again and you simply search for the item in the dropdown and click to select it. As soon as you log an outfit, the cost per fit information will update in your “Closet” tab, so the information is always up to date.
The Wishlist Tab
I use this tab to track items that are on my Wishlist, which helps me prioritize and save up for any new purchases that I want to make. This tab is pretty straightforward, but along with information on total wears and cost per fit, it can help you make informed decisions on whether an item will be a good addition to your wardrobe. For example, if you were interested in purchasing the Manolo Blahnik Callasli slingback sandals, but your Closet statistics showed you that your most worn items were sneakers, this may make you reevaluate whether it makes sense to spend $825 on sandals (as beautiful as they may be).
The Interfaces Section
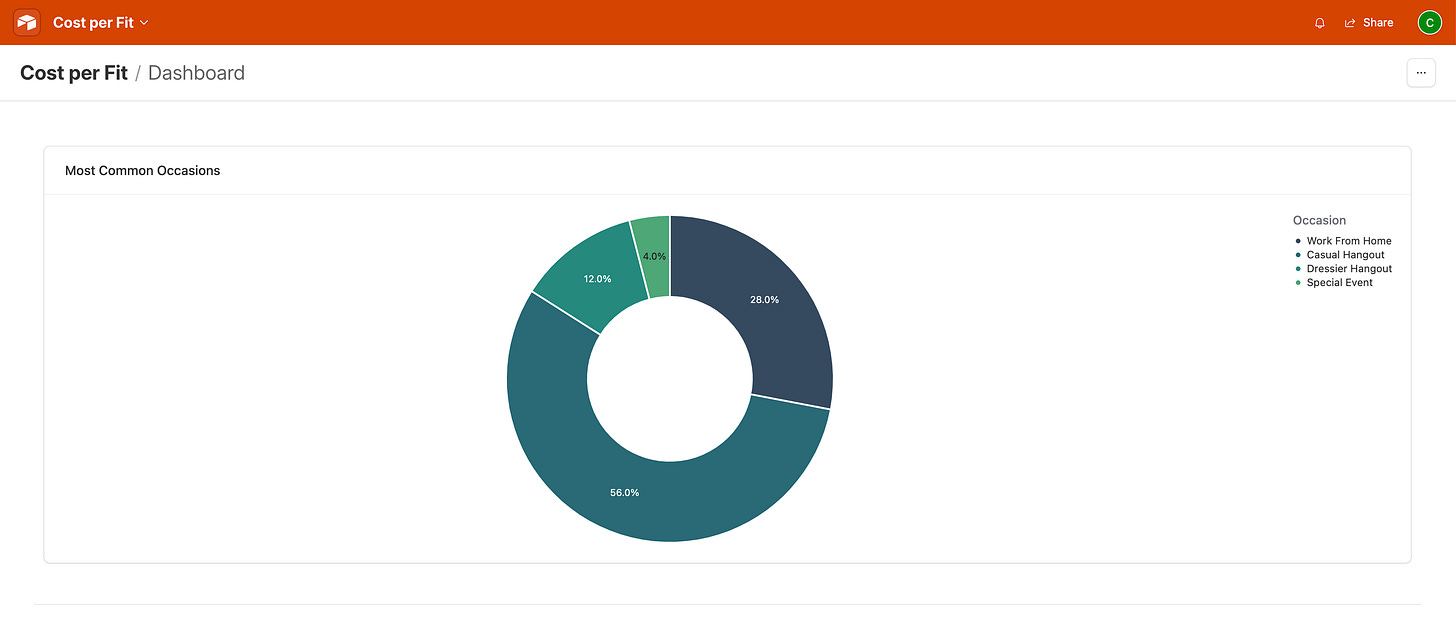
If you click on the “Interfaces” section in the top orange bar, it pulls up a dashboard that visualizes a few things such as “most common occasions” or “most common colors”. Looking at this dashboard, a takeaway could be that you are most often dressing for “casual hangouts”, followed by “work from home”. This info may help inform the volume and price point of items you purchase.
Duplicate and Customize this Airtable Template
If you’re interested in exploring using Airtable to track your closet and cost per fit, the first thing you need to do is create an account on Airtable. This is completely free for the first 1000 records, which should last you more than 2 years if you were to log outfits daily. I’ve used this for a few years and haven’t had a need to purchase a higher tier yet. Next, follow these steps to duplicate the template into your base:
Click this link to open a copy of the template: Template Copy
Click “Copy base” on the top left orange bar
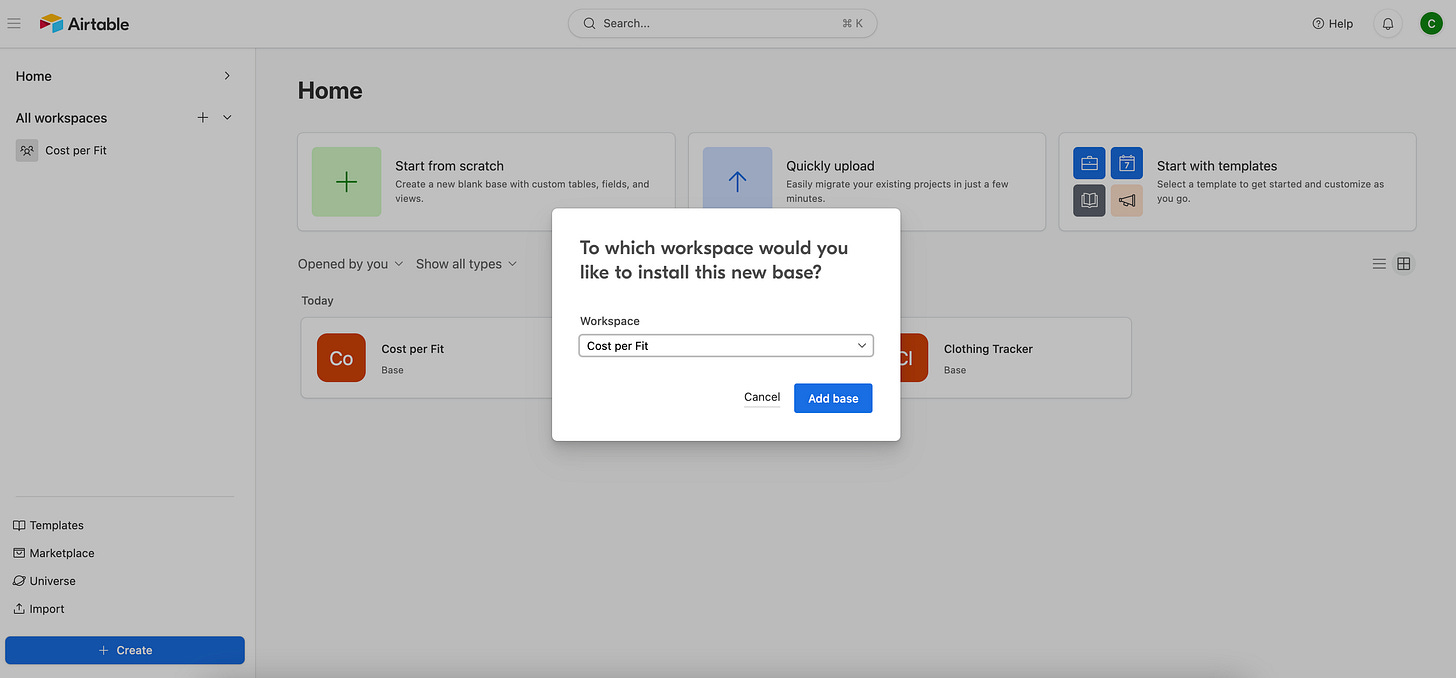
Choose a “Workspace” (if you’ve just created your Airtable account, you’ll probably just pick whichever default workspace was created for you) and click “Add base”.
Once you’ve downloaded a copy of the Base, you can open it up and update/modify as you see fit. I’d start off by deleting all of the records in the “Closet” and “Tracker” tabs, so that you can start entering your own info.
If you end up downloading this template and using it, I’d love to hear your feedback via the comments below! What are the best features of this template and what features would you add to make it even more helpful?
Here are the outfits that I logged this week! Note, as I mentioned above, the template that I shared only includes a portion of closet. So the stats listed below won’t match what you see in the template screenshots below.
Monday
Occasion: Working from Home
Jeans: Redone Jeans, purchased for $198.75, worn 22 times, cost per fit is $9.03
Top: Everlane White Tee, purchased 3 for $60, worn 2 times, cost per fit is $30
Tuesday
Occasion: Working from Home
Jeans: Redone Jeans, purchased for $195, worn 17 times, cost per fit is $11.47
Top: Sezane Blue Button Down, purchased for $110, worn 7 times, cost per fit is $15.71
Wednesday
Occasion: Working from Home
Top: Everlane Organic Box Cut Tee, purchased for $20, worn 3 times, cost per fit is $6.67
Pants: Abercrombie & Fitch Sloane Tailored Pant, purchased for $67.50, worn 3 times, cost per fit is $22.50
Thursday
Occasion: Working from Home
Top: Sezane Conrad T-shirt, purchased for $55, worn 9 times, cost per fit is $6.11
Pants: Lululemon Joggers (old, I don’t track cost per fit of loungewear or athletic wear because it gets worn a ton)
Friday
Occasion: Date Night
Top: Sezane Mathilda Top (similar), purchased for $140, worn twice, cost per fit is $70
Shorts: Free People Linen Shorts, purchased for $98, worn 5 times, cost per fit is $19.60
Catch you next Sunday,
Cost per Fit 💰
I may earn a small commission if you make a purchase through one of the links above.
Follow me on Instagram at @costperfit to see more daily outfits








This is genius.
Fascinating to see the actual cost per fit, makes the more expensive items much more reasonable (provided they get worn enough). Maybe I should go shopping more lol